Friday, June 28, 2013

Fixing error "material isn't enough, please replace new spool" and Do you have enough material for afinia?

This blog post will explain how to ensure that you have enough material left to print a model given a certain weight. If you get the error below this blog post will also be helpful.
If you are trying to eliminate the error above and you are sure you have enough material left, the fix is simple. Simply go to 3D print>Maintenance from the Afinia software, then click the new spool button. Set the material type you are using and the weight to 700 g and click OK. This will reset the program's internal counter of material used.
If you would like to know if the material you have is going to be enough to print a model you can weigh it on the black scale in the lab and then enter this weight into the new spool dialogue box instead. If you are also weighing the spool, an empty spool weights about 280 grams so simply subtract this from your measurement. The stand for the spool weighs about 52.3 g so this can also be subtracted or the scale can be tared before placing the spool onto it.

TIP: there is also a 500 g calibration weight that can be used if the scale needs to be re-calibrated. Follow the instructions on the cover of the scale to tare and re-calibrate.


How to clean sand paper

The plastic can be removed easily from the sand paper in the lab by lightly wiping it with a paper towel.

What to do if the max nozzle height isn't high enough

If are trying to set the nozzle height and the printer's max height isn't allowing the build plate to come up high enough simply type the maximum value into the 'to' field and click set nozzle height. Once this new height is set, the program then increases the max up by another mm. You can repeat this until you get the height you need.


Wednesday, June 19, 2013

What to do if the Afinia print button doesn't work

The print button

If you try to click on the print button from the Afinia software (mac version 1.4 (3.1)) and nothing happens then follow these steps to re-install.


  1. Drag afinia application to trash folder from the applications folder
  2. Delete the file: users/6dlab/Library/Preferences/AfiniaMicroboards.Afinia.plist
  3. Empty trash
  4. Restart mac
  5. Re-install Afinia software from either the google drive location, the interent, or the install CD in the lab

Note-the google drive folder that is referenced is:
6dlab/3-D Team/software install packages/
If you are on a different computer, replace "6dlab" with your own user name.

This might also solve other problems you may be having with the software but it has been verified that this procedure fixes this problem.

reference:http://www.cultofmac.com/90060/how-to-completely-uninstall-software-under-mac-os-x-macrx/

Tuesday, June 18, 2013

Volume by Shells and Disks


3D: Volume by Shells and Disks


The goal of this project is to teach students how to create a 3D visualizations of volume by shells and disks for any mathematical function using the following two programs:


Things that you'll need to do before starting to design:


  • Determine which function you wish to work with
  • Determine radius and heigh of each shell/disk
  • Determine how large you want the object to be

So for our example, our team used the following conditions:

  1. The function used: f(x) = -x^2-x+8 rotated around the y-axis for the x range from 0-2. 
  2. There were four disks and four shells made for this visualization of approximating volume, and with some simple mathematics and some help from the quadratic formula, we were able to determine the radius and heigh of each of the disks and shells.
  3. For the print, the radius of each object was scaled up by 14mm and the height was scaled by 5mm.

Now, let's move on to how the parts were actually modeled.

Towers of Hinoi

The base for the popular puzzle 'Towers of Hinoi' is being used since it can lay out the three models in a way that would easily convey the idea that the volumes were similar.

To make the Tower of Hinoi, we used Tinkercad, which can be accessed here: https://tinkercad.com/
  1. The first step for making the towers is to create the rectangular base. To do this, go into tinkercad and select the box tool and place it down upon the workplane. 
  2. Select the ruler tool and place it down upon the workplane. This allows you to type in the desired dimensions of the object. (We picked a rectangle with dimensions140x70x4mm)
  3. Select the Workplane tool and place it on top of your rectangle. Doing this will allow you to smoothly place one object onto another.
  4. Place the ruler on the corner of the rectangle so that the coordinates of the rectangle as compared to the origin of the ruler are (0,0).
  5. Choose the Cone tool and place it upon the workplane. We gave the cone a diameter of 12mm and a height of 4.28mm. Copy the cone and paste it twice, thus creating two new cones.
  6. We wanted to place the cone at coordinates (35,35), (105,35), and (175,35). Since the object has a radius of 6mm, we had to place the cones at (29,29), (99,29), (169,29) in order to get the center of the object to the desired coordinates. 
  7. Next, choose the Cylinder tool.  We gave the cylinder a diameter of 6 and a height of 35.71
  8. Now position these cylinders on the platform at (32,32), (102,32), (172,32).
  9. Now select all of the shapes and click on the group tool at the top right. Now you are done!
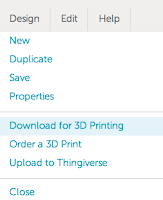
  10. At the top right, click design and scroll down to 'Download for 3D printing.' Say you want it as an STL and you'll now have your 3D model available to be imported into other 3D software!


Now that you have a basic understanding of how the design is made, try tinkering the rest of these basic shapes yourself! You'll want to make the hols slightly wider so that when everything is 3d printed, they will fit together nicely! (We would tell you how much wider the holes would be, but it appears the additional layer thickness that the machine produces varies depending on what model you have) If you still are lost, follow some of the tutorials on the tinkercad website under LEARN. Also, don't forget to add the hole in your design for the cone at the bottom of the tower.


OH! One more note.
To make the actual function, we typed the following into Mathematica:
RevolutionPlot3D[function,{x,0,2}]
Export["Name of file.stl",%]

GrabCAD


In searching for sites that contained a large number of STL files, I stumbled across GrabCAD. This site contains over 80,000 STL files. (Most of the files on this site are engineering based, but there exists a handful of mathematical objects such as knots, fractals, and klein bottles). It also has a program that may come in useful at some point called GrabCAD. GrabCAD theoretically is beneficial for getting external input on your 3D model. However, upon further inspection, it may be no more effective than plugging a 3D file into a shared Google Drive folder.

All the same, go check it out! You might find something awesome.

Tinkercad Tutorials


For those searching for a very user friendly 3D software, check out Tinkercad. One of the most useful things that Tinkercad has to offer is the tutorials built into it. To access these tutorials, simply click LEARN as shown in the image above. At this point You will see a section of tutorials that looks similar to the image below:
Upon clicking on one of these tutorials, one will be taught how to use the features that Tinkercad has to offer. The nice things about these tutorials is that it gives you step by step instructions as you actually  use the tools yourself to make the requested object. It isn't necessarily a perfect system. For example, you can completely botch up one of the tutorials, but Tinkercad will congratulate you with fireworks nonetheless. If you go back, you'll be able to see where you went wrong (hopefully) and be able to make the desired object properly the second time around.

So try it out, it's a very user friendly software!